A Model Context Protocol (MCP) server designed to connect to a CCTV recording program (VMS) to retrieve recorded and live video streams. It also provides tools to control the VMS software, such as showing live or playback dialogs for specific channels at specified times. - Retrieve video channel information, including connection and recording status. - Fetch recording dates and times for specific
Add this skill
npx mdskills install jyjune/mcp-vms@jyjune? Sign in with GitHub to claim this listing.Well-documented MCP server providing useful CCTV/VMS integration with clear setup instructions and comprehensive features
1[](https://mseep.ai/app/jyjune-mcp-vms)23[](https://archestra.ai/mcp-catalog/jyjune__mcp_vms)45# MCP Server - VMS Integration67A Model Context Protocol (MCP) server designed to connect to a CCTV recording program (VMS) to retrieve recorded and live video streams. It also provides tools to control the VMS software, such as showing live or playback dialogs for specific channels at specified times.89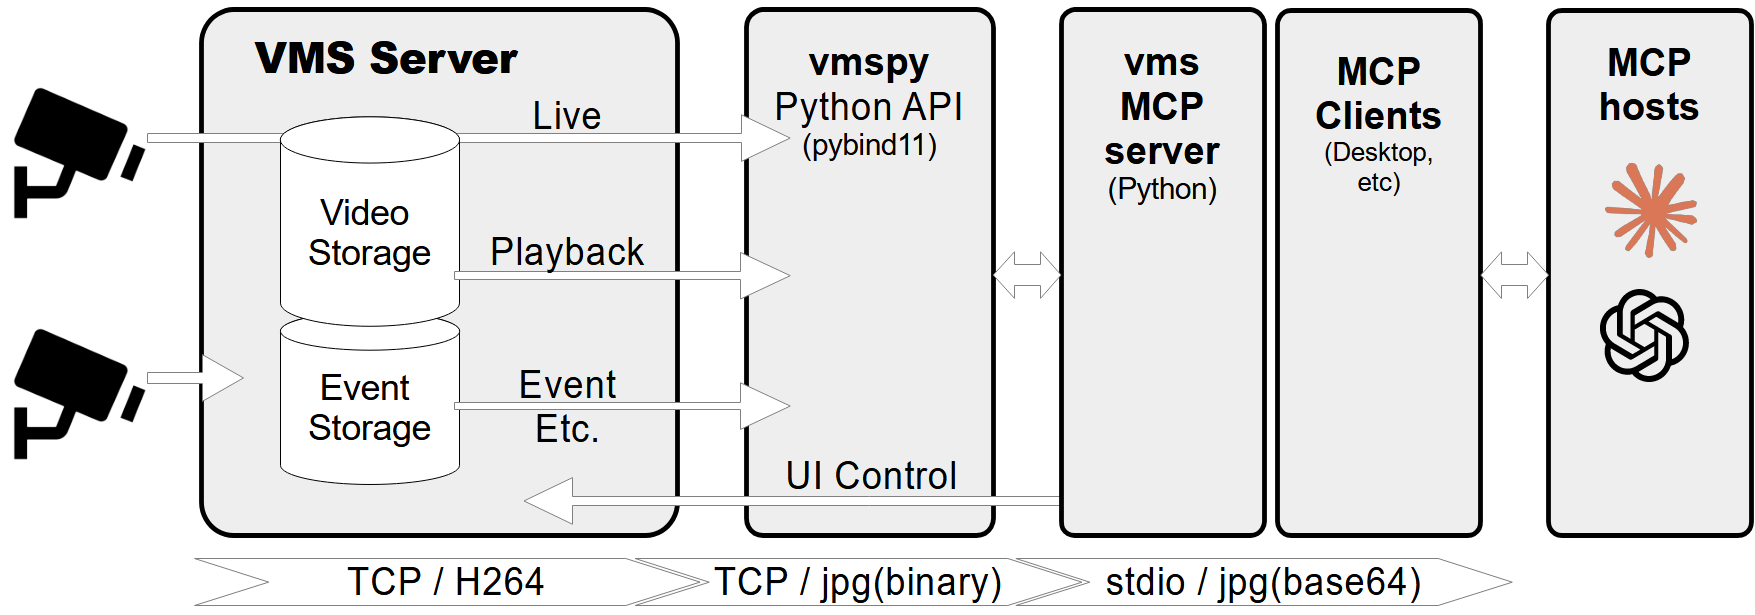1011## Features1213- Retrieve video channel information, including connection and recording status.14- Fetch recording dates and times for specific channels.15- Fetch live or recorded images from video channels.16- Show live video streams or playback dialogs for specific channels and timestamps.17- Control PTZ (Pan-Tilt-Zoom) cameras by moving them to preset positions.18- Comprehensive error handling and logging.1920## Prerequisites2122- Python 3.12+23- `vmspy` library (for VMS integration)24- `Pillow` library (for image processing)2526## MCP-server Configuration2728If you want to use `mcp-vms` with Claude desktop, you need to set up the `claude_desktop_config.json` file as follows:2930```json31{32 "mcpServers": {33 "vms": {34 "command": "uv",35 "args": [36 "--directory",37 "X:\\path\\to\\mcp-vms",38 "run",39 "mcp_vms.py"40 ]41 }42 }43}44```4546## VMS Connection Configuration4748The server uses the following default configuration for connecting to the VMS:49- mcp_vms_config.py50```python51vms_config = {52 'img_width': 320,53 'img_height': 240,54 'pixel_format': 'RGB',55 'url': '127.0.0.1',56 'port': 3300,57 'access_id': 'admin',58 'access_pw': 'admin',59}60```6162## Installation6364### 1. Install UV Package Manager65Run the following command in PowerShell to install `UV`:6667```shell68powershell -ExecutionPolicy ByPass -c "irm https://astral.sh/uv/install.ps1 | iex"69```7071For alternative installation methods, see the [official UV documentation](https://docs.astral.sh/uv/getting-started/installation/).7273### 2.Install VMS Server74 Download and install the VMS server from:75 [http://surveillance-logic.com/en/download.html](http://surveillance-logic.com/en/download.html)76 (Required before using this MCP server)7778### 3.Install Python Dependencies79 Download the vmspy library:80 [vmspy1.4-python3.12-x64.zip](https://sourceforge.net/projects/security-vms/files/vmspy1.4-python3.12-x64.zip/download)81 Extract the contents into your `mcp_vms` directory8283The mcp-vms directory should look like this:8485```shell86mcp-vms/87├── .gitignore88├── .python-version89├── LICENSE90├── README.md91├── pyproject.toml92├── uv.lock93├── mcp_vms.py # Main server implementation94├── mcp_vms_config.py # VMS connection configuration95├── vmspy.pyd # VMS Python library96├── avcodec-61.dll # FFmpeg libraries97├── avutil-59.dll98├── swresample-5.dll99├── swscale-8.dll100```101[](https://mseep.ai/app/7027c4cd-a9c1-43dd-9e74-771fc7cc42da)102
Full transparency — inspect the skill content before installing.